
Configuring anonymous user in Neurons for ITSM
You can allow users to access specific records and information in Neurons for ITSM without requiring a login ID or password. These users are referred to as anonymous users. For example, anonymous users can submit selected request offerings or view Knowledge Base articles using a public link.
Anonymous login enables access to the Self Service portal for external users, allowing them to submit service requests without authentication.
You can create a new role for anonymous access or designate an existing role such as Self Service or Guests. Administrators can grant role creation permissions to other roles like Service Owner. For more information refer to Working with Roles.
- Login to Neurons for ITSM as an administrator.
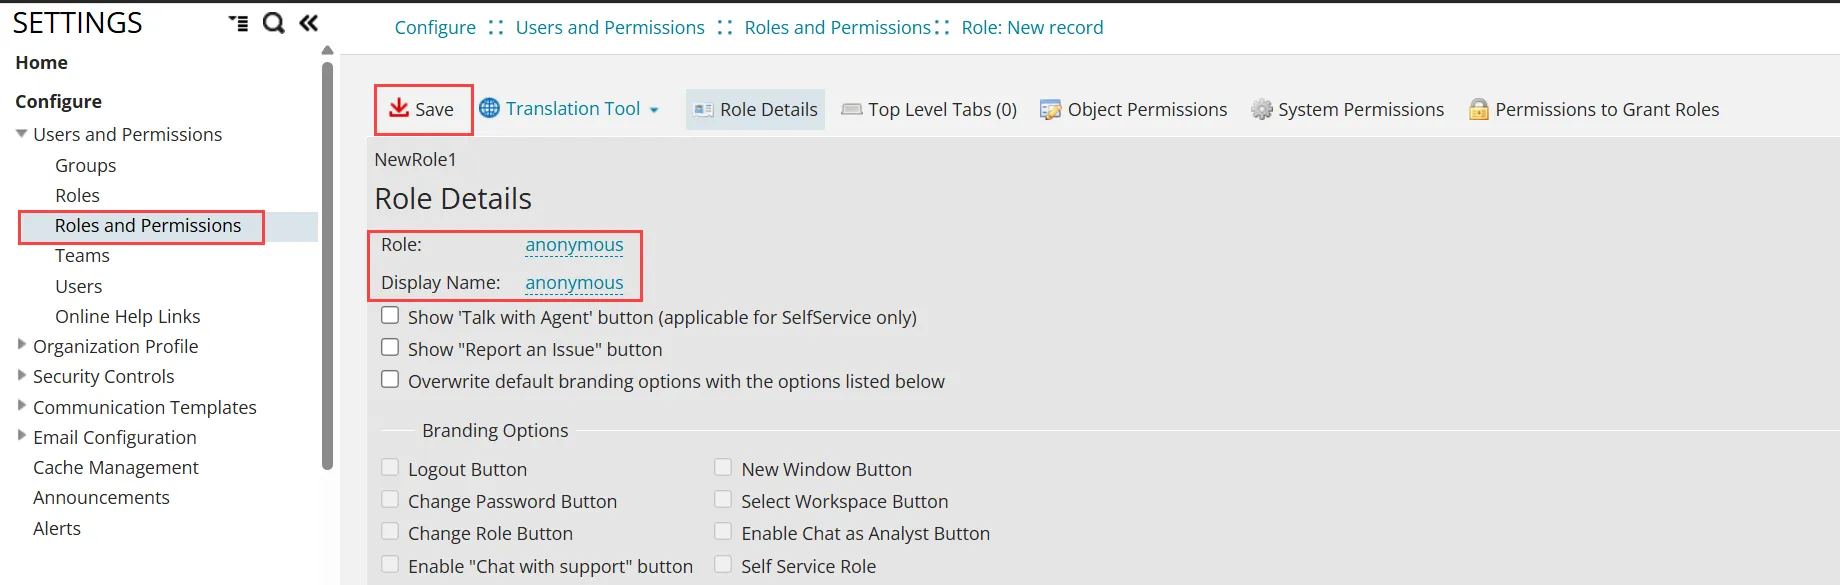
- Go to Configuration console > Configure > Users and permissions > Roles and permissions.
- Select Add New, to create a new role.
The Role: New record workspace is displayed.
- Enter a unique username (such as anonymous) in Role and Display Name text fields.
Create anonymous role
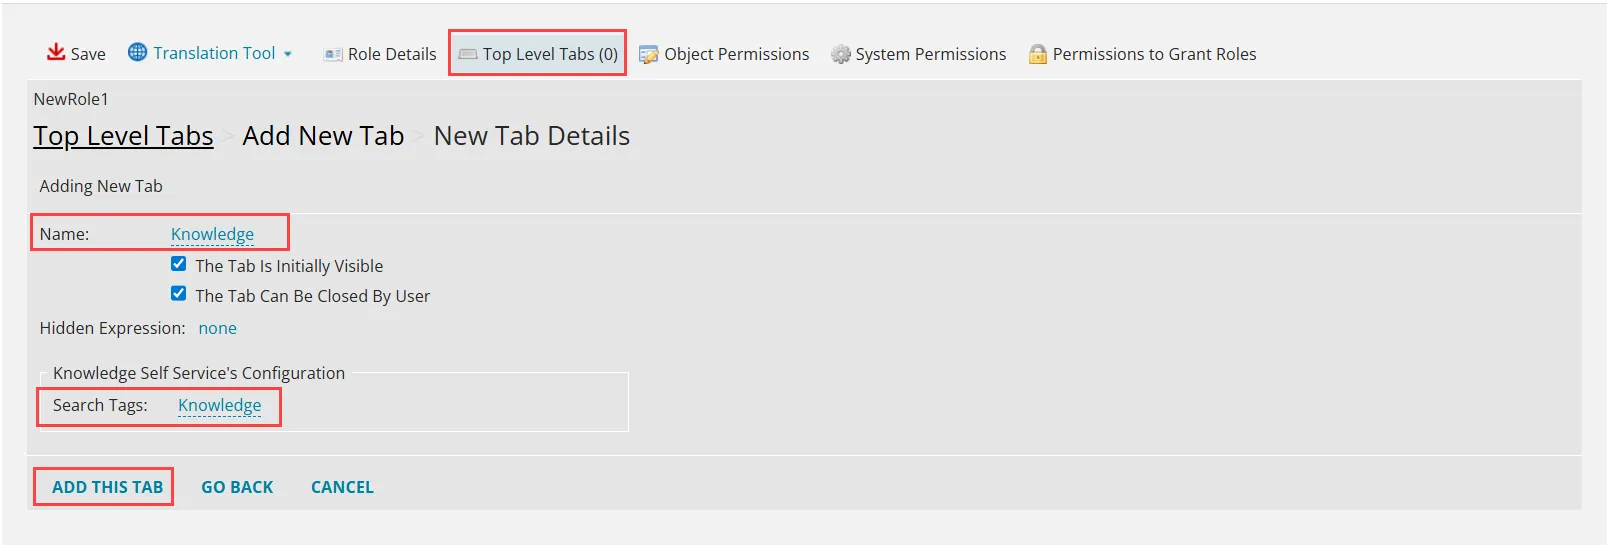
- Click Top Level Tabs.
- Select Add new tab, find Request Offering, and select it. This tab is required for anonymous users to reach the request offering forms.
- Enter Knowledge in name text field.
- In Search Tags field enter Knowledge and click Add this tab.
- Similarly, add other required tabs such as Service catalog, Alerts, My Items or Self Service Favorite. For more information, see Workspace.
- Click Save.
Assign Workspace
- Login to Neurons for ITSM as an administrator.
- Open the Employee workspace.
- Click New Employee. To know more about employee, refer Working with Employees.
- Enter the information in the required fields.
Field | Description |
|---|---|
First Name | Enter a generic first name. |
Last Name | Enter a generic last name. |
Primary Email | Enter a valid email address. Refer to Working with Email Inboxes. |
Team | (Optional) Select from the dropdown such as Service Desk. |
Login ID | Enter generic login id. |
Internal Auth Pwd | Set a password for the user. |
Organizational Unit | Assign the user to the appropriate organizational unit. |
- Click Save.
Record the exact Login ID, including its casing. You must enter the same value, with the same casing, when you enable anonymous access (in the AnonymousLoginID key and in the ConfigDB Anonymous LoginID field). A casing mismatch prevents anonymous login.
Assigning the Role to the Anonymous User
- Go to Roles tab, select the user and click link.
- Find the anonymous role you created and select it to assign it to the user.
- Click Save.
- Login to Neurons for ITSM as an administrator.
- Go to Request Offering workspace.
- In the Search request offering field, find the desired template such as address change, account unlock, and select it.
- In Define Request Offering, select the Anonymous Submit checkbox.
- Click Save.
- In the Publish Action Access tab, click the Org. unit, select the appropriate organization, and click OK.
- Repeat above steps 2 to 6 to add other templates for anonymous users as required.
How organizational units affect visibility:
- Anonymous users see request offerings based on the organizational unit you select. If you choose an organizational unit that includes everyone, anonymous users see all request offerings, but can submit only those marked Anonymous Submit.
- If an anonymous user attempts to open a request offering they do not have access to, they can log in as a registered user and continue the request.
You can perform bulk updates for request offerings. For more information, see the Performing bulk updates on request offerings section in About Request Offerings.
- Log in to the Neurons for ITSM configuration database (ConfigDB).
- Open the Tenants workspace, and go to Anonymous tab.
- Enter the login ID and select the Anonymous Access checkbox.
- On the application server, open C:\Program Files\HEAT Software\HEAT\AppServer\Web.Config in a text editor (such as Notepad).
- Confirm the following keys are present and set as shown:<add key="AnonymousAccess" value="true" /> <add key="AnonymousLoginID" value="anonymous" /> <add key="AnonymousDefaultApplicationID" value="default" />
- Set AnonymousLoginID to the anonymous user's login ID, matching its casing exactly.
- Save the file.
- Restart IIS.
Users can access Neurons for ITSM through a link you provide, such as in an email or on a web page. To enable anonymous login for your tenant
- Contact Ivanti Support.
- Provide the user ID assigned for anonymous access.
- Ivanti Support will enable anonymous login for your tenant.
Once enabled, share the URL with users. The URL format is your tenant URL followed by alp.aspx, which is in the following format: https://organization.saasit.com/alp.aspx.
This link opens the Request Offering workspace or a specific Knowledge Base article. Users can access the target content directly without logging in.
- Log in to the Neurons for ITSM configuration database (ConfigDB) for the system you are configuring.
- Open the tenant you are configuring.
- Go to the Anonymous tab.
- Select the Anonymous Access checkbox.
- In the Anonymous LoginID field, enter the anonymous user's login ID, matching its casing exactly.
- Select Save.
- Login to Neurons for ITSM as an administrator.
- In the Configuration console, go to Roles > Permissions.
- Select the anonymous role.
- In Object Permissions, enable View or Edit required workspace for:
- Alerts
- SelfServiceFavorite
- Click Apply Enhanced Permission and click Save.
From the 2025.4 version, Neurons for ITSM supports anonymous users in the UI v3 interface. You can configure a custom landing page to control access to request offerings and Knowledge Base articles.
- Login to Neurons for ITSM as an administrator.
- Go toConfiguration console > Build > User Interface Styles > Style Editor.
- In the Exceptions / Custom Roles section, click Add Exception.
The Add Exceptions / Custom Roles window is displayed.
- In the Role dropdown, select Anonymous User.
- In the UI dropdown, select UI v3, and click Save
- In the Action column for the anonymous user, click the Edit icon to configure the page settings. For more information, refer to Configuring the Enterprise Landing Page Using the Style Editor.
Users can access Neurons for ITSM through a link you provide, such as in an email or on a web page.
- Launch the application using the anonymous URL, in the format /alp.aspx (for example, https://organization.saasit.com/alp.aspx).
- Go to the Request Offering tab to access the forms.
This link opens the Request Offering workspace or a specific Knowledge Base article. Users can access the target content directly without logging in.