
Example: Using a Workflow to Schedule LDAP Synchronization
You can create a scheduled workflow to run LDAP connection synchronization at regular intervals.
For example, configure a workflow to synchronize a Trusted Agent LDAP connection at 24 hour intervals, and notify selected users if the synchronization is started or has failed.
Creating a Schedule Entry Workflow
- Create a schedule for the synchronization, see Creating a Schedule.
- From the Configuration console, click Build > Workflow > Workflows to open the Workflows workspace.
- Click Add new.... The Add New Workflow page appears.
- Enter the parameters.
Parameter | Description |
|---|---|
Business Object | The business object. Choose one from the drop-down list. In this example, choose ScheduleEntry. |
List Name | A unique name for the workflow object, for example TaLdapSynch. |
Display Name | A name that appears on workspaces, for example TA LDAP Synch. |
Description | A brief description of what the workflow does. |
- Click Save. The workflow is created.
- Click Add Version. First version of the workflow is created and the Workflow Designer appears.
- Click Configuration to open the Workflow Configuration dialog.
- Select Trigger Definition, and then select the schedule you created from the Use Schedule Definition drop-down field.
- Drag the following blocks onto the Workflow Designer:
- Start
- LDAP Sync
- Notification x 2
- Stop
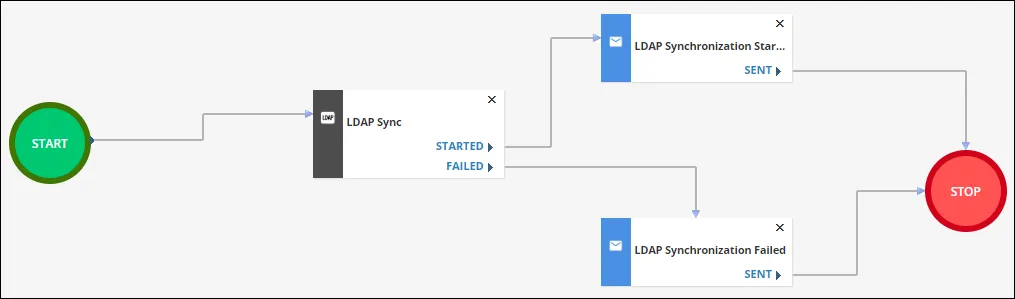
- Link the blocks as shown.
- Define the properties for each block and save them. Double-click the block to open the properties dialog.
LDAP Sync Block Parameters | Value |
|---|---|
Title | Enter a title to appear on the block. |
LDAP Configuration Name | Select the LDAP configuration to apply the scheduled synchronization to. |
Notification Block Parameters | Value |
|---|---|
Title | Enter a title to appear on the block. |
From | Add the email address for the sender, for example "[email protected]". |
To | Add the email recipients email address. You can add a hard address, or you can use an expression. for example "$(GetGlobal("ServiceDeskMgrEmailAddress"))". |
CC and BCC | Add email addresses to these fields if required. |
Subject | Add a subject line. |
Body | Add the body message. |
- Select the Validate before saving checkbox to validate the workflow before it is saved.
- Click Save. The workflow is saved and now appears on the workflow list.
If validation fails. see Validating Workflows for further information.