
Configuring the Discovery Application Server
On this page you will specify information about the configuration of the Discovery application server and the Discovery configuration database. Follow these steps:
Starting the Configuration for the Discovery Application Server
The first time that you see this page, there is no Discovery configuration database, as shown in Discovery Application Server Page: No Database.
Discovery Application Server Page: No Database
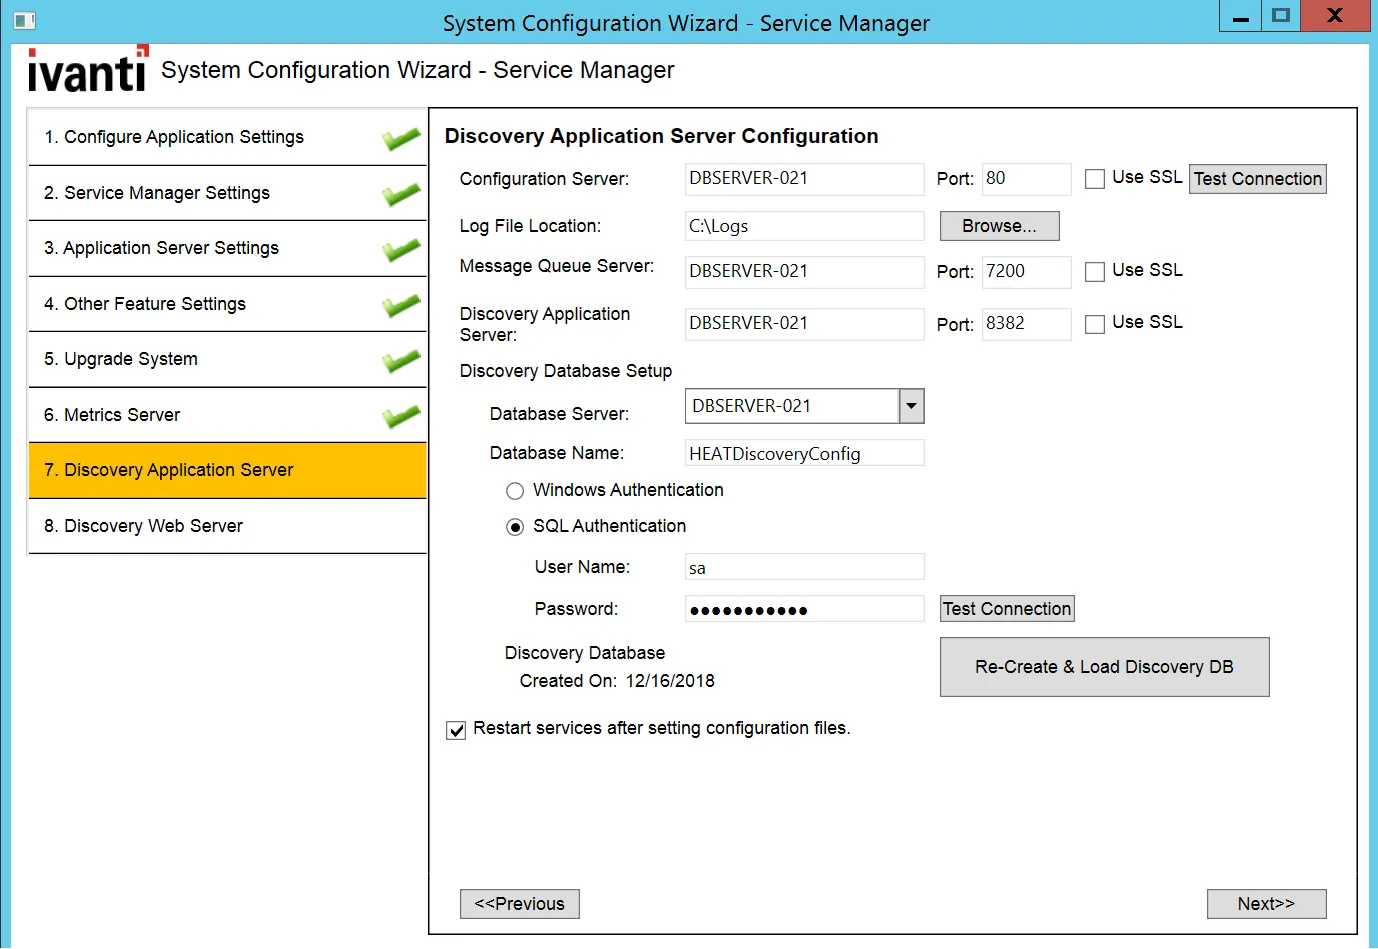
- Enter values into the fields:
Parameter | Description |
|---|---|
Configuration Server | The host name or fully-qualified domain name of the configuration server. The default value is the name of the host that you are logged into now. Do one of the following:
If you use SSL, you must enter a fully-qualified domain name. |
Port | The port number of the configuration server. The default is 80, or 443 if you check Use SSL. |
Use SSL | Enables SSL encryption to the configuration server. |
- Click Test Connection to test the connection to the configuration server. The system displays a success or failure message. Click OK to close the message. You must have a working connection to the server. You cannot continue with the configuration if this connection does not work.
- Enter values into the fields:
Parameter | Description |
|---|---|
Log File Location | The folder on the server that you are logged into now where the log files are located. The default location for the log files is C:\Logs. Do one of the following:
|
Message Queue Server | Where the Neurons for ITSM message queue server is located. The default value is the server that you are logged into now. Do one of the following:
If you use SSL, you must enter a fully-qualified domain name. |
Port | The port number of the Neurons for ITSM message queue server. The default is 7200. |
Use SSL | Enables SSL encryption to the Neurons for ITSM message queue server. |
Discovery Application Server | Where the Discovery application server is located. The default value is the server that you are logged into now. Do one of the following:
If you use SSL, you must enter a fully-qualified domain name. |
Port | The port number of the Discovery application server. The default is 80, or 443 if you check Use SSL. |
Use SSL | Enables SSL encryption to the Discovery application server. |
Discovery Database Setup | |
Database Server | The name of the system proposed for the Discovery configuration database. The default value is the server that you are logged into now. Do one of the following:
|
Database Name | The name of the Discovery configuration database. The default name is HEATDiscoveryConfig and you cannot change the name. |
Authentication Method | There are two authentication methods for the Discovery configuration database, one for creation and one for access. Select the authentication method for creating the Discovery configuration database:
|
User Name | (Only if you selected SQL Authentication) The user name associated with the Microsoft SQL authentication. |
Password | (Only if you selected SQL Authentication) The password associated with the user name for the Microsoft SQL authentication. |
- Click Test Connection to test the connection to the Discovery configuration database server. The system displays a success or failure message. Click OK to close the message. You must have a working connection to create a database. You cannot continue with the configuration if this connection does not work.
- Do one of the following:
- If this is the initial setup, go to Configuring a System without a Discovery Configuration Database (Creating a New One).
- If your system already has a Discovery configuration database, go to Configuring a System with a Discovery Configuration Database (Editing One that Already Exists).
Configuring a System without a Discovery Configuration Database (Creating a New One)
An initial installation does not have a Discovery configuration database. The system displays this: "No Discovery (HEATDiscoveryConfig) Database is detected."
Follow these steps to create one.
- Enter values into the fields:
Parameter | Description |
|---|---|
Create & Load Discovery DB | Click to create and load a new Discovery configuration database. The system displays the New Database dialog box. New Database Dialog Box 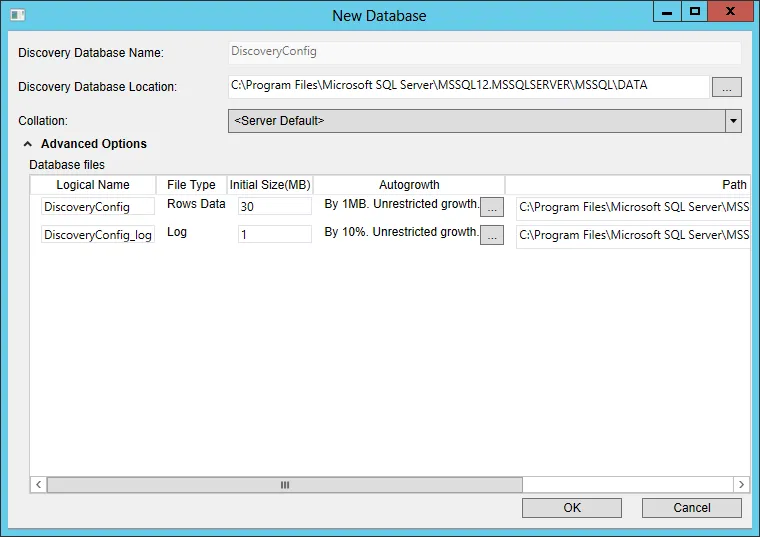 |
Discovery Database Name | The name of the Discovery configuration database. The default name is HEATDiscoveryConfig and you cannot change the name. |
Discovery Database Location | The location for the Discovery configuration database. |
Collation | The set of rules that describe how to compare and sort strings, such as the order in which letters are sorted and whether case matters. NOTE: ISM application does not support case sensitive SQL Collation. |
Advanced Options | |
Logical Name | The logical name of the Discovery configuration database. This name is stored as a file name, and is a separate entity from the read-only database name that is displayed in Microsoft SQL Server Management Studio. |
File Type | The file type, either database records or database logs. These values are read-only. |
Initial Size (MB) | The initial file size, in MB, when creating the Discovery configuration database. |
Autogrowth | Specifies how the database will expand when it reaches its maximum file size. We recommend having at least 1 GB or 10% to start with. Click ... to update the values. |
Path | The location of the file. Click ... to update the location. |
File Name | The name of the file. |
- Click OK in the New Database dialog box. The system creates the Discovery configuration database.
- To restart the Neurons for ITSM services after you finish the installation, check Restart services after setting configuration files..
- Click Next. The system displays the Discovery Web Server page.
Configuring a System with a Discovery Configuration Database (Editing One that Already Exists)
If you are upgrading or repairing Neurons for ITSM you already have a Discovery configuration database.
- To recreate the Discovery configuration database, click Re-Create & Load Discovery DB. The system displays a confirmation message.
If you have customized the existing Discovery configuration database, specify a different location in the Discovery Database Location dialog box. Otherwise, the system overwrites your customization when you recreate the database.
- Click OK at the confirmation message.
- To restart the Neurons for ITSM services after you finish the installation, check Restart services after setting configuration files..
- Click Next. The system displays the Discovery Web Server page.